
Focusing on a single object is easy, but what if you want both near and distant objects to be sharp? For this you need to know how to control depth of field.
We all know that to make your subject come out sharp you need to focus on it. And modern autofocus systems operate with such speed and precision that this is almost guaranteed. They can check the focus at many different points in the frame and select the correct one automatically, and even track subjects as they move across the frame (predictive autofocus). But what they don't take into account is 'depth of field', which is a much more important measure of a picture's overall sharpness. It's ignored not because it's unimportant, but because it's too difficult for a machine like a camera to evaluate.
What is depth of field?
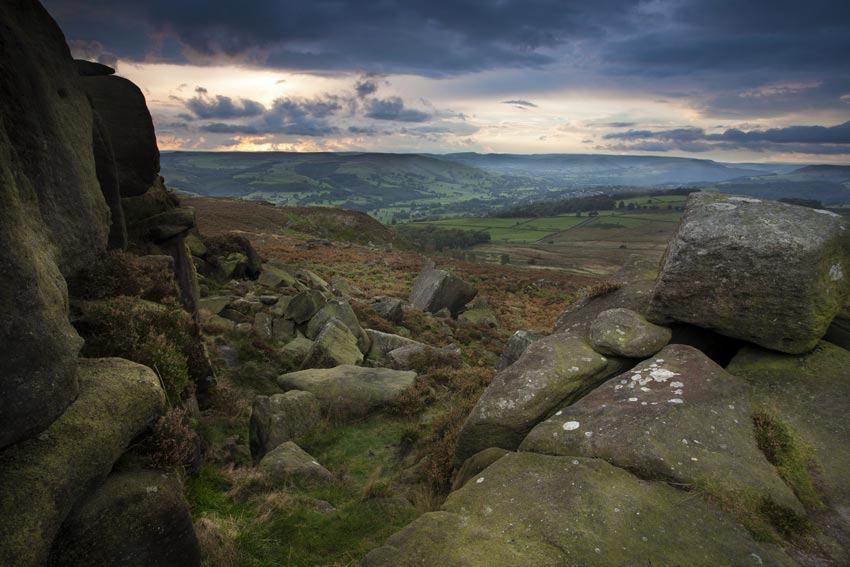
In theory, only subjects a precise distance from the camera (the distance you've focused on) will be perfectly sharp. In practice, the sharpness falls away slowly, so that objects some way behind the subject or nearer the camera can still look quite sharp even if, technically they're out of focus. In other words, there's quite a bit of leeway before objects start to look out of focus. This leeway is the 'depth of field', and it has a big impact on the appearance of the photograph. For example, in a landscape shot you might want everything sharp, from the wooden stile just a few feet from the camera to the mountain peaks in the distance. In other words, you want maximum depth of field. Alternatively, for a romantic portrait shot you might want to throw a distracting background out of focus. For this, you would want 'shallow' depth of field.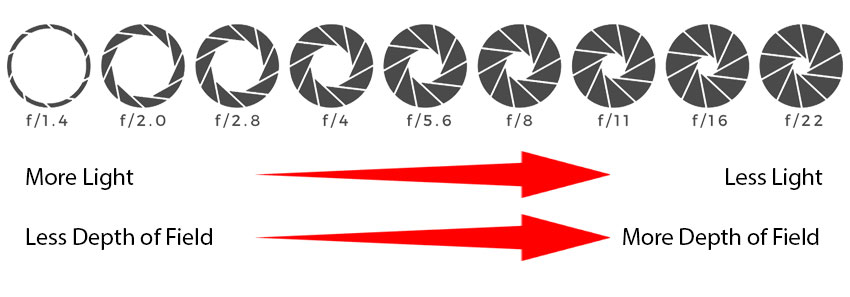
Use it to your advantage
The point is that depth of field can be worked out and used to your advantage. You can control the depth of field by the way you adjust the camera. The camera's autofocus system can focus on a specific object, but that's about its limit. Only you, the photographer, can take the next step and control the depth of field. Most photographers are aware that wide lens apertures produce shallow depth of field and small lens apertures produce greater depth of field. The optical science behind this is complex, but what it boils down to is that at smaller lens apertures, the sharpness of out-of-focus objects falls away more slowly. In other words things are much nearer or further away before they start to become blurred.
Depth of field is also affected by the focal length of the lens. The longer the focal length, the shallower the depth of field. This is one reason why portrait photographers prefer longer-than-average focal lengths - because this usually blurs the background. Conversely, wide-angle lenses are useful to landscape photographers because it's easy to get everything in the frame sharp, right from the foreground to the distant horizon. Depth of field also changes according to the distance of your subject - the focus distance. The greater the focus distance, the greater the depth of field. Similarly, the closer you focus, the more shallow the depth of field becomes. This is why depth of field isn't a problem with subjects some way from the camera, but a real headache with close-ups. You'll seldom see a close-up which is sharp right from the foreground to the background, unless the scene has been set up very carefully by the photographer to be as two-dimensional as possible.
The fourth factor in depth of field is one which is seldom examined in any great detail, but which is probably one of the most important. The larger the sensor, the shallower the depth of field. It's the sensor's physical size that's the key factor here. A DSLR offers much less depth of field than a compact digital camera, and a full-frame DSLR offers even less. This isn't strictly due to the size of the sensor but actually the required focal length of the lens. For example, on a full frame DSLR, a photographer might use a 50mm lens for a portrait shot. If he were using a digital SLR with an APS-C size sensor, he would require a 30mm lens to get the same angle of view. However, as already discussed above, the wider 30mm focal length will give greater depth of field than a 50mm focal length. This is one of the reasons many portrait photographers chose a camera with a large image sensor. This is exaggerated even more with compact digital cameras where the sensor size is about 10 times smaller and therefore the camera uses, for example, a 6mm lens which gives tremendous depth of field.
All these factors intermingle to make depth of field a potentially confusing business. In practice, though, the decisions are generally pretty straightforward. In any one situation, the camera you're working with is already decided, and you've probably settled on the camera position (the subject distance) and the focal length (zoom position) needed to compose the shot nicely. All that's left for you to adjust the depth of field with is the lens aperture.
So how do I work it all out?
You're no longer dealing with just the focused distance - there's also a near limit' (the nearest distance where objects will still look sharp) and the `far limit' (the farthest distance where objects will still look sharp). The distance between the near limit and the far limit is the depth of field. But how do you work out what the near limits and far limits are?
With fixed focal length (non-zoom) lenses, it's all rather easy. The lens has a focusing scale marked on the barrel and an index mark showing the distance you are focused at. Either side of this index mark are further pairs of marks, usually colour-coded so that wherever you're focused, the `f8' markers (for example) would indicate the near and far limits of the depth of field on the distance scale. Many lenses include several sets of markers for different lens apertures.
With these, managing depth of field becomes a lot easier and you can start to plan your shots much more effectively. Let's imagine you want to get both a nearby gate and a distant hillside sharp at the same time. A modern camera will offer to focus on one or the other, but both are wrong, or at least highly inefficient choices. Instead, the ideal focus point will be somewhere in between, so that the gate is just within the near limit of the depth of field, while the hillside is just within the far limit.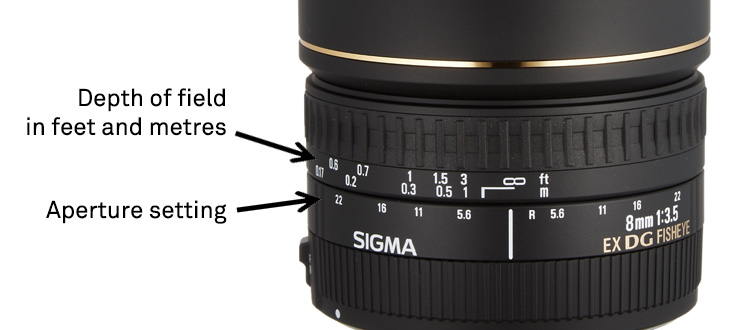
Rather than focusing on one thing in particular, think in terms of zones of sharp focus and how to make sure all the principal elements in your photography can be made to fall within it. Modern cameras make this harder. First of all, you have to disable that sophisticated and expensive AF system and focus manually instead. Second, zoom lenses don't have depth of field markings. This is because the depth of field changes with focal length. With the exception of certain ancient 'trombone' zoom designs, depth of field markings are no longer possible.
A rather neat trick is to set the far limit at infinity; you'll make sure that distant objects remain sharp, while maximising the depth of field towards the camera. This is a well-known technique known as 'hyperfocal' focusing.
As well as telling you the distance to focus at, they tell you the nearest distance at which objects will still be sharp. You look at the scene in front of you, work out how near the nearest object is and look up the lens aperture you need to use.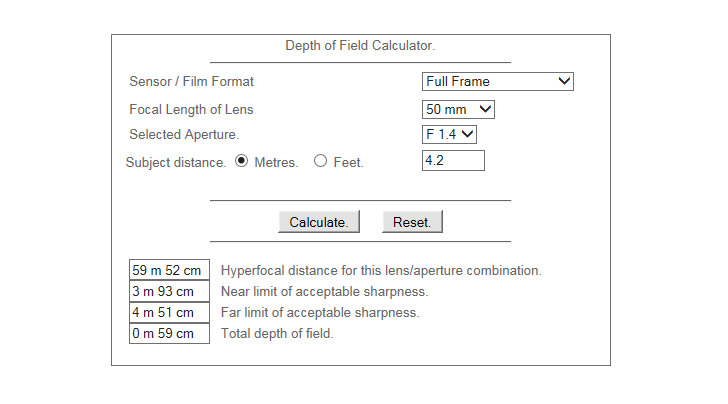
It's important, then, to understand the significance of depth of field and how to manipulate it if you want to properly control the sharpness in your photos. One general rule worth bearing in mind is that to get two objects at different distances to be equally sharp, you need to focus at a point one third of the distance between them. This changes slightly with close-ups, where the focus distance should be nearer halfway between them.
Many DSLRs have depth of field preview buttons. Normally, all viewing is carried out with the lens at full aperture, regardless of the aperture value that's going to be used for the exposure. The camera stops down to the required aperture when the picture is taken. Depth of field previews, however, stops the lens down manually. This darkens the viewfinder image, but also gives an idea of how much depth of field there will be. Depth of field preview buttons work, but the viewfinder image is often too dark for details to be clearly visible, and it's difficult to judge the exact sharpness levels as a result. With digital cameras you can simply take the shot, examine it close-up in Playback mode and re-shoot it if you need to. However, it's less hassle to be able to get the depth of field right first time.
Instead of relying on your camera's autofocus and program AE exposure modes , try switching to manual focus and manual aperture control. Remember that photographs don't consist of a single plane of sharp focus, but an extended 'zone' of sharpness which you can control. You really can point and shoot - and not because you've invested in the latest and most expensive technology, but because you're using a principle that even the smartest camera has yet to exploit.
Creative Use of Depth of Field
Hyperfocal Distance
Landscape photographers generally weigh sharpness all the way from the far distance right up to the foreground, and this is where an understanding of 'hyperfocal distance' proves crucial.
Zone Focusing
Many street photographers don't bother with focusing at all as it's too time consuming. Instead, you can use a knowledge of depth of field to 'zone focus'. Here, you choose a lens aperture and a manual focus distance which gives enough depth of field for any of your usual subjects. For example, at f8 everything from 1m to 8m might be acceptably sharp.
Shallow Depth of Field
Shallow depth of field is not always a bad thing. In portraits it helps blur unwanted backgrounds, and it can also be used to make the main subject appear sharper. Here, these frost-covered railings appear to have even more 'bite' because their sharpness contrasts with the soft background. You can achieve shallow depth of field with longer focal lengths and wider lens apertures.

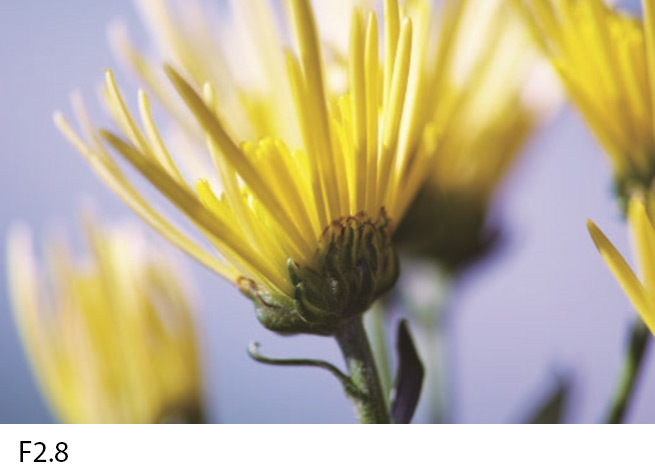
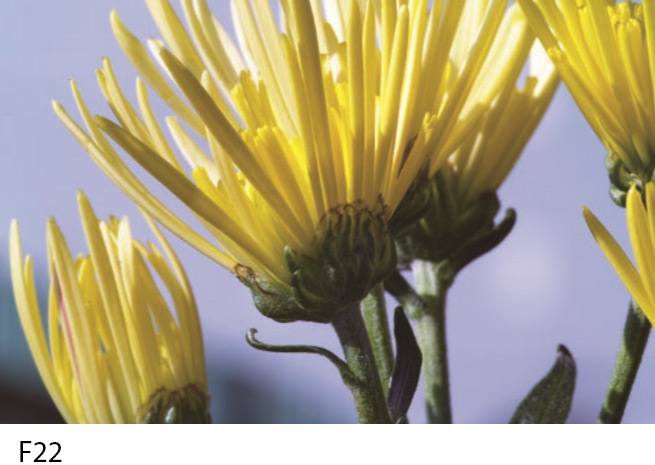
Depth of Field And Close-Ups
Depth of field is a perennial problem for close-up photographers, and the closer you get, the worse it gets, to the point where even at your lens's minimum aperture the depth of field is only a few millimetres. Here, for example, the photographer had to settle for just keeping the bloom's stamens sharp - there was no way of keeping the nearest and farthest petals sharp too.
Circles of Confusion
When a point in the subject is perfectly focused it should appear as a point on the image sensor. But when it's slightly out of focus it is instead reproduced as a small disc. The technical term for this is `circle of confusion', and you'll find it comes up frequently in discussions about depth of field. If this circle of confusion is small enough, the subject will look sharp even if it is slightly out of focus. The point is that the maximum size for the circle of confusion varies according to the camera or, specifically, the sensor size. Compact digital cameras have much smaller sensors than DSLRs, which means images must be magnified much more to make the same-sized prints. This in turn means that the maximum allowable size for the circle of confusion for compact cameras is smaller than that for DSLRs. For the record, the usual circle of confusion size used for 35mm film or full-frame DSLRs is 0.03mm, for APS-C sized DSLRs it's 0.02mm, and for compact digital cameras it's 0.005mm. The circle of confusion value is part of the mathematical calculations used to work out depth of field figures.
To find out the depth of field and hyperfocal distance of any given lens and aperture combination, see the Depth of Field Calculator utility.